Sunday, May 18, 2025

A Japanese gofun doll


This doll has arrived for repairs.

She is a Japanese doll from maybe the 1930's.


Her head was wrapped separately from her body as the connection had broken.


Her nose needs fixing.

This doll was finished with 'gofun'. That is a ground up oyster shell product.


There are issues with the doll's limbs.


All the limbs have silk upper parts stuffed with wood wool. The silk is shredding.


Silk is not available locally so I have found the next best fabric to use. This is a rayon fabric that I will use to wrap the shredding silk parts. I dyed the rayon to turn it from the bright white into a more subdued and antique looking colour.


Here are her legs wrapped in rayon.
No more wood wool leaks.

Her arms get a similar treatment.


Her nose is filled and the repaired area is getting the colour tweaked to blend in with her original surfaces.


After a bit of reseach, I find out that the head is connected very simply. It is mounted on a stick that gets pushed into the wood wool inside her torso. That allows the head to turn.
So, I replace the broken stick with a bamboo skewer.


Friday, May 9, 2025

A vintage voicebox squawks again


This vintage plastic doll has arrived with a few requests.


She needs lip and eyebrow paint as her originals have long won off.


She needs restringing as her legs are attached with hooks and elastic. The elastic has stretched out with time. The elastic seems a bit odd as her arms and head are attached with more typical flange joints but, it is most certainly original.


More troublesome for me is that her voicebox is broken and silent. I have never tried fixing a plastic voicebox like this.


Off come the legs and out comes the voicebox.

I still cannot see how the elastic attaches.


After she gets beheaded, the elastic attachment is exposed. It is a simple nail holding the two ends.


Back to the voicebox.
I can see the weight inside but I need to get it out to analyse why it does not make noise any more. It will not fit out through the broken top and the top has been solidly glued onto the body.


The only option is to saw open the body of the voicebox.

Here is the weight freed from the voicebox.
How does this make noise?


Flipping over the weight reveals the reed. Blowing air through it makes it squawk so it is not the problem.


The weight has a latex gasket held on by a cardboard ring.
The gasket seals against the sides of the body to push air through the reed in the weight as the weight moves back and forth.
The problem is likely that the gasket has lost its flexibility so replacing it should work.


Here is the gasket.

Before I tried to make a new gasket I sawed open a brand new voicebox that was too long to fit in this doll. Inside was an identical gasket. I swiped it and installed it in this voicebox. It worked!


Here is her new facial paint.


And here is her repaired voice box that actually works!


Wednesday, April 16, 2025

Broken celluloid


This celluloid doll was made by the German company Schildkrot.

He has an obvious issue. 
The top of his head is in several pieces. The enveplope contains a handfull of very small pieces.


A less obvious issue is that his arms are hanging and loose. The elastic needs replacing.


At one point some of his head pieces were taped together. You can see old tape residue along the edge here. That needs to get cleaned off before reassembling the bits.


Some of the pieces have cracks.


Some of the contents of the envelope.

This is going to be a persnickety jigsaw puzzle!


One nice thing about celluloid is that you can fuse pieces together with acetone. So, once you figure out where a piece goes, you hold it in place while running a fine paintbrush dipped in acetone along the crack.

Here I have pieced some of the smaller bits into their spots.

The darker peach is a permanent colour change caused by the adhesive tape used in that previous repair.


Gradually he gets back together.


All the pieces are back together although the top of his head has not been fused on to the bottom yet. I am contemplating what to do with three small chunks that are missing.


His head is fused together now and I have filled in the holes with a tinted epoxy.

Now to see if I can minimize the scars and even out his colour.


He aslo has a nose dent that I would like to try to make less obvious.


One of the things I am trying is an epoxy paste that I have tinted.


The paste makes gives his nose a better contour.


Lots of trial and error to get to this point!


His arms get restrung and he is ready to go home.


Sunday, April 6, 2025

A broken bisque baby


This doll has arrived.

She is a vintage bisque head doll who has met with a grievous injury.

Most of her bits have arrived. Apparently some were in smithereens and were not saved.


Step one is to glue the pieces together.
That reveals where the missing pieces came from.


With bigger defects I like to put a in a base to support the sculpting epoxy. This is a small piece of automotive mesh that I have glued under the hole.


I forgot to take a picture of the epoxy putty in place but here it is smoothed and painted to blend in.


Thursday, April 3, 2025

A detailed Schoenhut doll's restoration


This doll has arrived to be restored.

She did not always look like this. She had a total head repaint when her owner bought her. 


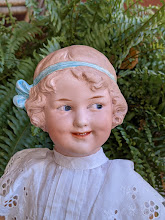
She once looked like this.

This is Schoenhut's model 105.

She had been repainted but did not look like she should.

So, off came the repaint!


Here she is part way through the repaint removal.
Sometimes, when removing repaint, you find nice original paint underneath.
Unfortunately this was not the case here.
There is little original paint left.
Her owner took off most of the overpaint and decided to send her to me.


Here is where I start.

There is white filler here and there.
There is some original skintone paint left.
There are two colours evident on her headband....which is the original?


I like to remove old fillers as sometimes they are obscuring original details. Here the filler is giving the carved bow a too high profile and a too smooth surface.


After a bit of poking about with magnifying glasses, I find out that the blue is the original colour of her headband. 
Here, I have removed the pink paint from her headband and much of the previous filler from her face. This does reveal a large hole in her nose. What caused that is anyone's guess!


Here is the bow after the filler and pink paint layers have been removed.

Now I contemplate the very dark hair colour. Is it original?

Almost certainly this doll had a factory repaint. The Schoenhut factory offered repaint services to dolls that had been played with and needed their paint refreshed. That would mean she was originally made with a blue headband and had it changed to pink during the return to the factory.

Was her very dark hair colour also a change from her original?


A celluloid doll with eye issues


This doll has arrived to address her missing eye. It hopefully is not missing. Something is rattling around inside her head. We shall hope it is her eye and it is not broken. The eyes are glass.

There are glue remnants around the remaining eye. According to her history, her eyes were repaired before.


She was made by the German company Schildkrot. She is made of celluloid.


On further inspection I find some cracks in her legs. Someone already has had a go at the cracks as there is lots of glue residue along them.


Happiness!

Once the doll's head is removed, out pops the missing eye......intact!

The curved widget is the piece that sits inside her head to string it to the body.


Here is a view inside her head. I have to re-glue the loose eyeball into the socket. But, my fingers are not long enough to position the eyeball.

I need an eye holding tool.


A bit of wire gets bent into an odd shape.


This shape will hold the eyeball as I insert it into the socket.

I use a few dabs of tacky glue on the socket. It is water soluable so, if I mess up, I can reverse the installation with water.


Success!

As the old glue holding the eyes is aging and weakening I added a layer of epoxy around each eyeball inside the head to hold them in more securely.


Her legs were more troublesome.

Normally broken bits of celluloid can be fused together with acetone. But, the previous repair and the old glue remnants were not letting that happen. So, I elected to use tinted epoxy to fill in the cracks. She has scars which could be filled/sanded/painted to disguise them. But she has clothes that will hide the scars. They will remain as is.


Ready to go home.